Understanding White Ink and Underbase Options in CADlink Software
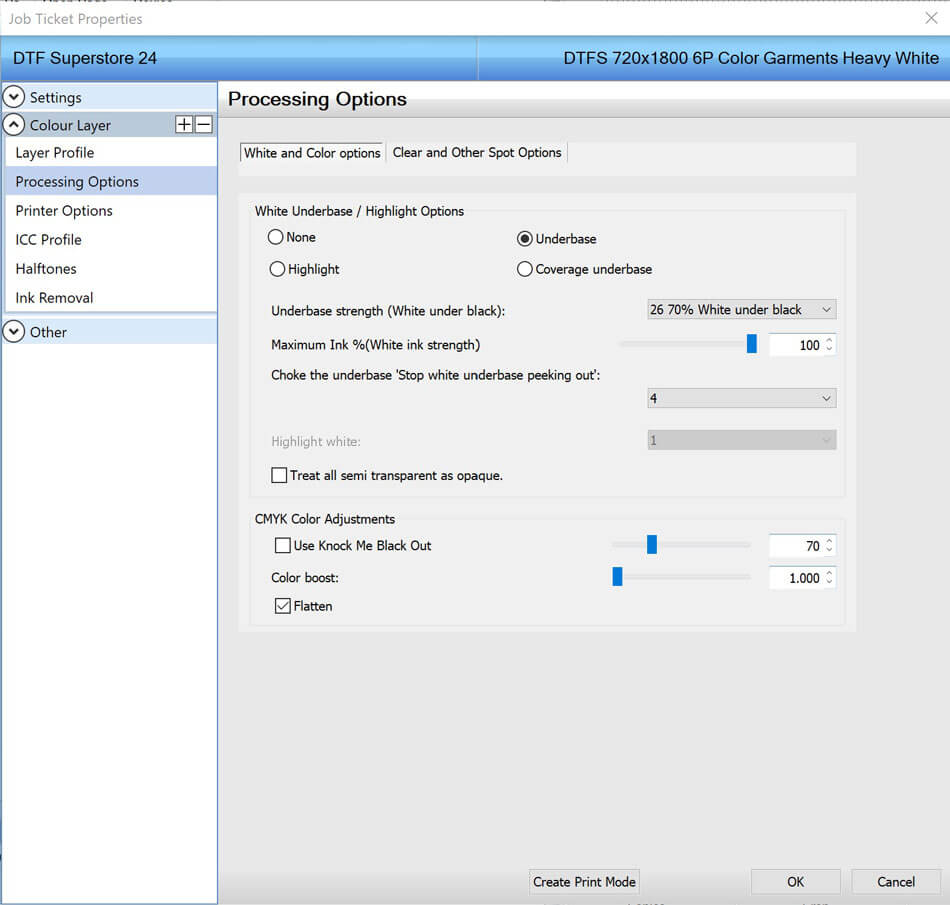
When you need to tweak your white ink settings, you have two options for reaching those settings. The first is by right-clicking your artwork and using the pop-out menu to go to properties.
From there, select Processing Options on the left side.

Starting from the top:
First is our White Underbase/Highlight Options. You will have 4 options, which are none, underbase, highlight, and coverage underbase. The good news here is that you will almost exclusively use Underbase. You do not want to use none, as we need white ink to adhere our powders for the direct-to-film process. And highlight and coverage underbase are more suited for direct-to-garment printing.
Underbase Strength under black ink is next. This applies specifically to under black ink only, and you don't need as much white ink to make the color pop, because it's black. You still need some, however, to make the powder stick. By default, this may be at 50%. Some say they like more and push that towards 70 or 80%.
The next setting is Maximum Ink %, our white ink strength. Default is 70%, some people will go up this to 100%. This will depend on how your white ink was first set up.
And finally is an important setting: Choke the underbase 'Stop white underbase peaking out'
This pulls back your artwork ever so slightly to counter white ink from peeking out under your ink colors. That can be either caused by the pressing process or very subtle misalignments. Regardless, we are talking about hairlines here. We like to use a setting of 3 - 5 at the DTF Superstore for our choke setting.
At the bottom of these settings, you can see a checkbox option Treat all semi-transparent as opaque. You most likely will not need to check this when dealing with the direct-to-film process.
Or Access These Settings Using the Color Adjust Button

We like to adjust the setting using the color adjust button on the bottom. You have access to the setting you need and a few more.
First note the radio buttons with the options of ICC Setting, Photo, and Graphics.
You won't use the ICC setting often, and most of the time, you will use the Graphics setting. This provides a little bit of kick to the image's color, especially on the typical team, school or company logos we print so often. If you were printing a photograph that had some skin tones, or particular scenes captured, then you may not want the color punch, so use the photo setting in that case.
Your underbase settings right below here of Max Ink, Choke, and Strength are the exact same settings as above. This will carry over to each weather you adjust these settings here or from the properties, and do the same as mentioned above.
We like using color adjust here because it allows us to tweak the other settings, such as saturation and each color. So it's nice to do this in a single spot.
These few settings can make a difference in your final print, so we hope this helps you understand that better!
If you haven't yet tried CADlink, view all of our CADlink offerings here.
