Accurate DTF Colors with the Nix Color Sensor & CADLink Tutorial
As a DTF producer, you likely know how difficult it is to reproduce accurate colors. Luckily, we’re here to help. Here at DTF Superstore, we’ve crafted the perfect duo to solve all your color needs. And, it’ll help reduce your production costs!
All you need to get started is the Nix Color Sensor, and our very own Nix Color Profiling add-on for CADLink. You’ll be able to achieve results with most DTF printers, although dialogues or options might vary.
Once you have the tools you need, it’s time to dive into our comprehensive tutorial. Prepare to achieve color perfection!
How It Works
So you’re ready to produce accurate DTF colors, but you’re curious how it works? Using the Nix Color Sensor and our Nix Color Profiling add-on for CADLink, you’ll create an ICC profile. Using your ICC profile, you can ensure accurate color results - however often you need them!
What about production costs? While you’re in the print mode creation process, you’ll be calibrating your ink amounts and optimizing your white underbase. As a result, you’ll use less ink and save on production costs in the long run.
Now let’s get started!
Step-by-Step Tutorial
The following tutorial is designed to be printed onto a black shirt. You can follow these same steps for any other color of shirt, but you’ll want to adjust your numbers and percentages throughout.
-
Open up CADLink Digital Factory.

Make sure to click “yes” when asked to allow changes to your device, and let the installation process work its magic!
-
Set a time delay for the Nix.

You’ll be prompted to set a time delay for the Nix, with the default set at three seconds. This is the amount of time you’ll have to move from swatch to swatch during set-up. Choose the number of seconds that works best for you.
-
Select a print mode from the displayed list.

In the bottom half of the print mode dialogue, there will be a list of print modes. You can choose any mode to start with - as you will eventually configure all of them.
Once you’ve selected a print mode, click the “full print mode creation” button located at the top of the print mode dialogue. You’ll be prompted to rename the print mode. Make sure to include the ink, film, and garment type you’re setting this up for. This will help you quickly pull this print mode up any time you need it in the future.
Make sure to leave the “enable advanced screening” box checked before you move on to the next step.
-
Select your page size, graphic print, print size, printer options, and variable dot set-up.

Depending on what DTF printer you use, your options and dialogues may vary here. However, the general questions and answers should be the same.
You’ll be prompted to select a variety of settings, including page size, a graphic print for reference, and the size for that graphic print. We recommend selecting the “recommended graphic”, since it will cover most white use situations.
Make sure to select accurate printer options, as you will not be able to change this later on in the process. The default options should work fine, or you can adjust them based on your situation.
If your printer has variable dot capabilities, you’ll be shown a set-up dialogue. The recommended and default options can be selected here.
-
Optimize your maximum white ink settings.

In this dialogue, you’ll personalize your white ink settings to ensure the optimal amount of white ink. We recommend setting the minimum at 50%, the maximum at 80%, and the increment of change at 5%.
-
Print, powder, cure, and press your test shirt.

Follow your printer’s necessary steps to print the chart. Then, you’ll powder it, cure it, and press it onto your test shirt.
Repeat the above steps with all your test charts. Make sure to use the same test shirt, so you can easily compare the samples.
-
Find the desired transition point and re-optimize your percentages.

Compare the samples and look for the transition point: where the colors and the whites begin to fade. This transition point indicates that not enough ink was used to protect the graphic from the shirt below.
Once you’ve decided on the best result, enter this percentage into the field labeled “preferred white ink % from the printed chart”.

Next, you’ll be asked to set the amount of white under black. This number is relative to the maximum white level which you previously set. You can choose the recommended option unless you have extensive knowledge of your printer’s operation.
- Set your rough ink limits and print test charts.
Next, the “rough ink limits” dialogue will open. You’ll want to select “lower ink amount.” If flooding occurs, select “flooding: use lower than A1 ink chart”.

Once your charts have printed, be on the look-out for even colors with no flooding or bleeding. Make sure the colors are vibrant and not grainy. Press, powder, and cure the prints onto your test shirt to ensure you’re choosing the best and brightest option.

Now that you’ve decided which percentage produces the best results, enter this under “select the preferred value from the chart”.
- Select your fine ink limits.
If you’re close to your goal color but still not quite there, this is your opportunity to tweak your results. We recommend setting your “max ink level” somewhere between 320 and 340.
Afterwards, you will print one final round of swatches to ensure that you’re still satisfied with your percentages from earlier.
If there is flooding, banding, or coalescing, select “print is bad” and you can adjust your settings again.
If you’re satisfied with your result, select “print is good” and proceed to the next step.
- Calibrate your swatch charts.
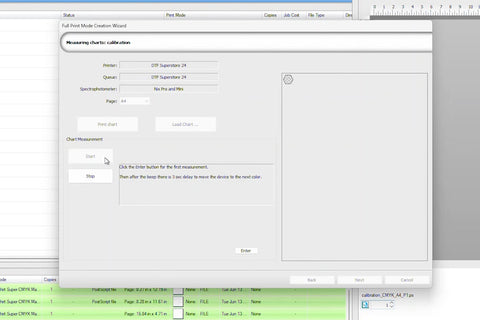
A new dialogue will open up that’s labeled “measuring charts: calibration”. You’ll want to click “print chart”, then powder, cure, and press it onto your test shirt.

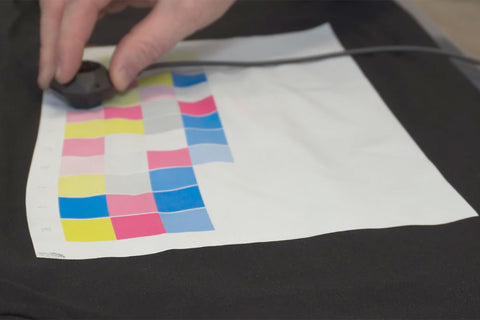
When you’re ready to begin scanning your swatches, select “start” on the dialogue. You will then begin scanning each swatch using the Nix sensor. Your computer will beep when it’s time to move from one swatch to the next.

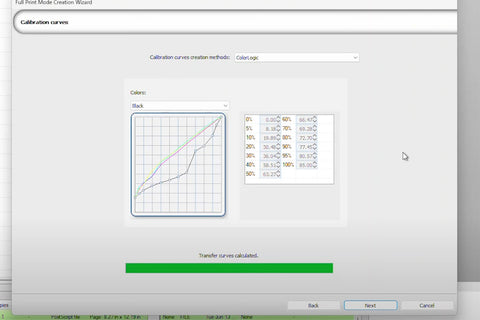
Once you’ve scanned each swatch, click next. The “calibration curves” dialogue will open. CADLink recommends selecting the “ColorLogic” creation method at the top of the screen.

-
Measure your ICC charts.

Once you’ve completed scanning each of your swatches, click next.
-
Set your profiling settings.

You’ll have the option to choose between “safe black” or “custom black”; we recommend sticking with safe black.
-
Set your default profile.

We also recommend selecting “apply ICC to grayscale”, which will help produce a dark black shade.
-
Label and save your ICC profile.

After you’ve labeled each section appropriately, you can click next. You’ll be taken to a summary page that goes over the modes and settings that you used to create your profile.
Finally, click finish. Now that your ICC profile has been completed, you’ll be able to access it anytime you need from the print mode drop-down menu.
In conclusion, using the Nix Color Sensor and Nix Color Profiling add-on for CADLink is a powerful and effective way to produce accurate DTF color results. This dynamic duo will take the stress and uncertainty out of your DTF prints, and help you achieve the consistent quality that you’ve been working towards.
But don’t take our word for it: go ahead and try it out yourself! You won’t regret it.
